Tuesday, December 14, 2010

Mount an ntfs drive with read only permissions in Linux

Say I have booted a Linux using Live cd or something, and I cant modify any windows file since the windows ntfs file system is in a read only mode. So this is how we can remount it in a read write mode:
Commands:
umount /mnt/hda1
modprobe fuse
ntfsmount /dev/hda1 /mnt/hda1
mount

Reference:
http://backtrack.offensive-security.com/index.php?title=Howto:NTFS
else find the google cache if the page is unavailable :(
http://webcache.googleusercontent.com/search?q=cache:hzWgy5XSMucJ:backtrack.offensive-security.com/index.php%3Ftitle%3DHowto:NTFS+http://backtrack.offensive-security.com/index.php%3Ftitle%3DHowto:NTFS&cd=1&hl=en&ct=clnk&gl=in&client=firefox-a

Commands to set network settings in Ubuntu

ifconfig eth0 192.168.1.24 netmask 255.255.255.0
route add default gw 192.168.1.1
echo nameserver 192.168.1.10 > /etc/resolv.conf
ifconfig eth0 up

Tuesday, June 8, 2010

Manual Removal of sguza.exe and shey.exe worms

New malwares in town. Not much info available on Google.

shell\open\command=muza\\\sguza.exe
shell\open\command=carpet\\\shey.exe

Again my AV failed to recognize a malware, but when I saw autoruns and hidden folders named muza and carpet in my pen drive, I got suspicious. These files and folders are system files, so if you cant see them, then you need to go to Tools->Folder options->View and set the following settings:

enable Show hidden files and folders
Hide protected operating system files.


Malwares often attribute themselves as system and hidden to stay invisible.
Unfortunately Autoruns and Autoplay were enabled by default on my new system. And it popped the option of "action=Open folder to view files using Windows Explorer". Which could be misleading
as I found the same action in autorun.inf as well. After inspecting the autorun.inf, I believe even if you right click and explore/open its copy gets executed. It has variants in the name of shey.exe and sguza.exe and moves through removable drives. Once its executed you cannot remove the autorun.inf or the hidden folders. I took the help of utility Handle (http://technet.microsoft.com/en-us/sysinternals/bb896655.aspx) by Sysinternals to find out which app has opened the Autorun.inf.
Execute Handle.exe using command prompt and output the results to a text file. And search using CTRL-F for autorun.inf.


explorer.exe pid: 540 administrator
6E4: Section \BaseNamedObjects\MSCTF.MarshalInterface.FileMap.ECE.B.NMKKAD
6F0: Section \BaseNamedObjects\MSCTF.Shared.SFM.ECE
6F8: File (RWD) C:\Documents and Settings\lada\My Documents\Downloads
700: File (---) E:\autorun.inf

And as always it was explorer.exe:
which means the malware is using explorer.exe as a host.
I killed and restarted explorer using task manager.

Alternatively we can use Process Explorer (a tool by sysinternals, which is kindof an advanced Task manager) to inspect the explorer.exe and search for SHEY.EXE or other handles and then close them.
Start process explorer and do a CTRL-F search for any handle with the names: SHEY.EXE, SGUZA,EXE, mrpky.exe 194.EXE, 21782259.EXE OR KITA375[1].EXE, OR autorun.inf:


Search for the file names.
If found, close those handles.


After you kill the malware instance, using Proc Explorer OR by restarting explorer.exe, you will be able to delete the muzo and carpet and autorun.inf files.

I deleted the autoruns and the hidden folders named muza and carpet.
The next step was to clean the registry. So you search for all occurrences of shey.exe and sguza.exe and delete them. The malware may use some other names as well, which I found here:

http://www.prevx.com/filenames/X285138109880396664-X1/SHEY.EXE.html


I found the malware still running inside the explorer with the name :
MRPKY.EXE
This file is located in C:\Documents and Settings\your_username\Application Data

Again searching the registry I found an entry in the WinLogon startups: (You may use Autorun and ProcessExplorer tools from Sysinternals for this)

HKEY_LOCAL_MACHINE\SOFTWARE\Microsoft\Windows NT\CurrentVersion\Winlogon\Taskman with a value of C:\Documents and Settings\username\Application Data\mrpky.exe

So I deleted this registry entry and deleted the mrpky.exe as well. I searched for other names but as of now couldnt find any.


I restarted my system, and I am not seeing any weird behavior as of now. If I insert a pen drive, it doesnt show any autorun.inf. Nor I am seeing any suspicious exe or dll in explorer. (using process explorer)
Thats all for now.

Summary:
1. If you cannot delete the hidden folder muza or carpet, then kill the explorer.exe using task manager and restart explorer.exe. This will kill the malware instance.
2. Now delete the hidden folders muza or carpet and then delete then autorun.inf as well from your removable drives.
3. Open registry and search for all keys containing sguza.exe or shey.exe and all other probable names here :
http://www.prevx.com/filenames/X285138109880396664-X1/SHEY.EXE.html and delete them.
4. Disable autorun and autoplay.(use links section)
5. If at all, the malware still works then it suggests we missed a copy of it. So when you restart your computer, it will be executed again. But all the instances use explorer.exe as a host, so if you want to kill them, restart explorer. But any undeleted registry entry will restart the malware when you restart windows. That doesnt sound good, but we can wait for the AVs to create a tool or reverse engineer it for more details.

Prevention tips:
Disable autoruns and autoplay for all removable drives. http://support.microsoft.com/kb/967715
Update:
For more details about the malware, you can upload the exe on virustotal.com which provides the AV detection results from various Anti Viruses.
Here are the results from the unpacked mrpky.exe:
http://www.virustotal.com/analisis/c887b8c000b422f41a06dc36e0d2a9bf84f114520da0e08cb83dc07005446260-1276933820
Links:
Handle by SysInternals: http://technet.microsoft.com/en-us/sysinternals/bb896655.aspx
Turn off autoplay: http://support.microsoft.com/kb/967715
VirusTotal: http://www.virustotal.com/

Sunday, April 25, 2010

Getting root/administrator on a Windows XP

Getting root/administrator on a Windows XP
*********************************************************************

Well this is my old school trick, the Sticky keys hack. I kindof discovered (though I wasnt the first person to do it, but it was pretty less known hack a few years back) it years back, and I am surprised to see that it still works. This is not a one-click kiddie stuff, though its simple and easy.
In the end, I will also show you how to stay STEALTHY and cover your tracks.(to some extent)

Let me explain you the case precisely:
You have a guest account or any other NON-ADMINISTRATOR account.
And you want admin privileges. Naturally I assume, your admin doesnot want to share the admin password with you.

There is ATLEAST ONE CONDITION for this hack to work (apart from this, I aint aware of any):
Your non-admin account must have write permissions for the system32 directory. That is you should be able to write/modify any simple file in the system32 directory.
Dont worry, we are not going to mess with the ugly SAM and SYSTEM files.
Now I would like to explain some basic mechanics, if you are not interested you may skip it. But if you understand it, I believe you should be able to find many such hacks.

Basic mechanics:
***************************
When a user logs in, and a process is executed, it runs generally with the privileges on the current user. So if you are the user named "Guest" and you run a firefox exe,
in the task manager, under the process list you can see the username as "Guest" for the firefox exe. Now if no user is logged on, and a process is executed, then what will happen?
Our best guess is that it would run with system privilege. So if you can find a file that runs/can be made to run before a user logs in, then it should do our dirty job.
Sometimes it happens that certain softwares like to run their files before a user logs on. If somehow we could replace such files with our shell or any bat file, our dirty job
could be done again :). But its not that easy. The shell is not necessarily executed as expected. Nevertheless, its a possibility. If you like to experiment you can try to find any such files. I ll let you know later,
how to get a sample list of such files.

The Sticky keys Hack
**********************************

There is something called Sticky keys in Windows XP. If you press SHIFT key >=5 times, a window should pop up,
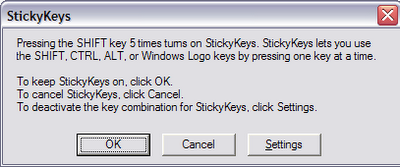

if it doesnt, you can enable its shortcut through Control panel->Accessbility Options-> KeyBoard Tab, in the Sticky Keys group, click on Settings, under Keyboard shortcuts,
check the setting for "Use shortcut". Good news is that you can enable it from a Guest account as well:
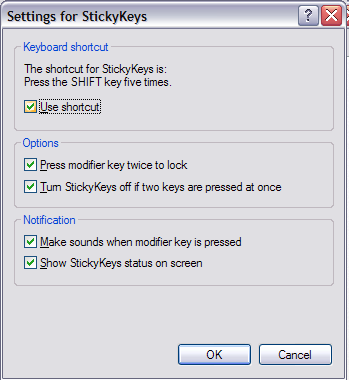


Now if you press SHIFT >=5 times, the file responsible for firing this window is under system32 with the name sethc.exe

You got it, take the backup of this sethc.exe and rename it to say sethc_original.exe. Now copy cmd.exe from system32 to somewhere and rename it as sethc.exe.
Copy the new sethc.exe (which is in fact cmd.exe, our shell) in system32, and press yes, when it asks for the confirmation to overwrite.


You can test by pressing SHIFT >=5 times, and you will see a command window being opened. Its not of much use since the privilege of this shell is the Guest or the
no-admin only.
(We cannot use the following commands from the Guest account,unless we have the admin/system privilege, if you try to do that, you will see an error of type:)
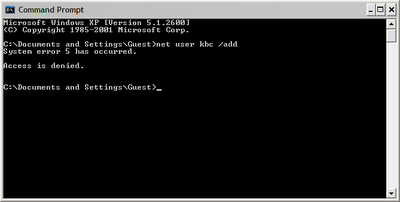

To escalate the privilege, restart you windows, but do not login to any account. And when you are at the logon screen,
press the SHIFT key>=5 times and boom, there you got you shell with SYSTEM privileges.

Now you can add a new administrator account "hacked" with a password "hax0rpassw0rd" using the commands:


net user hacked "hax0rpassw0rd" /add
net localgroup administrators hacked /add
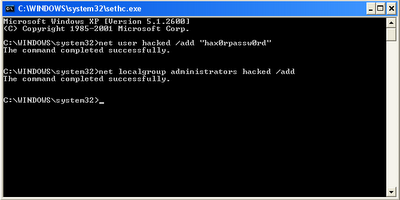


And now you can logon to your new admin account now.
You can also reset the administrator password, using the shell, but I wont recommend that for obvious reasons. Our job should be to stay as stealthy as possible.
Just install your software and clear your tracks. Wwith this SYSTEM privilege shell you can also see the files that execute before a user logs in.
Use the command tasklist for that and save the output in some file, for later viewing.

How to stay stealthy.
****************************
Your new account can be easily seen in the Control Panel-> User accounts and in the My Computer in the form of documents as well. This isnt a good sign.


But we can hide our account to a certain extent.

Beware of the Registry, Dont mess around!
Open the registry by regedit, and navigate to the Folder:
HKEY_LOGON_MACHINE->Software->Microsoft->Windows NT->Current Version->WinLogon->SpecialAccounts->UserList

Create a new DWORD value here, set the name as your newly added username, "hacked" in our example, and let the value be zero.


This will stop the display of your user account in Control Panel->User accounts and in the My Computer documents.
However for the expert eyes, your user directories can still be seen in "Documents and Settings" and through the command net user.
So you may need to do some additional tasks, like removing your backdoor account entirely before leaving.

Tuesday, April 6, 2010

Crontab error "/bin/sh: root: command not found"

Today I struggled with making the crontab work on my system. I am using cron jobs for the first time. Although I always wanted to understand how it works, esp as I heard that they are good for periodic backups. But it was quite frustrating for me to make it work, especially if you prefer to google without reading the man pages thoroughly. Let me just explain what I was trying to achieve and how the error got resolved. Now I realize I could have saved a lot of time, had I read the man pages :(
But sometimes we are in a hurry and we are not at all interested in understanding how things work, but in making it work as quickly as possible.
For those who want a quick look at resolution of this error I would say, check your cron syntax:
1. If you are making changes in a local cron file using crontab -e, the job entry should contain 6 fields (not the username)
like this:
* * * * * /home/build_auto/echo.sh

A wrong entry like this:
* * * * * root /home/build_auto/echo.sh

would cause cron to interpret "root" as a command.
The syntax "* * * * * root /home/build_auto/echo.sh" is valid for system crontab file /etc/crontab.
Most of the syntax related examples can be found by reading the man page for crontab files:
man 5 crontab

Creating a simple cron job to run a shell script

I am simply trying to create a cron job and which would execute a shell script for me at regular intervals. So first I read through a simple tutorial from where I learn about the basic syntax and the fields.
Now for my simple cron job, I create a simple shell script which will output some data in another text file. And for simplicity I would like to run it every minute. (so that I can quickly confirm how it works)
So here is my simple shell script which will append a string ("test") to another text file (test.txt)
echo.sh
#!/bin/sh
echo "test" >> /home/build_auto/test.txt

This way everytime the script echo.sh is executed, it will append a string "test" in a new line in test.txt. So when our cron job executes perfectly i.e. every minute, we see "test" in every new line.
Say I save my echo.sh in a location : /home/build_auto/
Now you can add a cron job at two places:
1. In the system cron file /etc/crontab
2. And in a new crontab file using the crontab command.
This file is will be stored in /var/spool/cron with the same name as the username.

Editing the System cron file /etc/crontab

This way is not advisable as you would be directly interfering with the system cron file which is required by cron daemon. Still if you would like to add an entry, open /etc/crontab in an editor and add an entry like this:
* * * * * root /home/build_auto/echo.sh

There are seven fields seperated by spaces. For details on the fields read the man page.
The first field is for minute, second for hour, third for day of month, month, day of week, user account which will be used for execution and command name which is the full path of our shell script.
The *s indicate the job will be executed every minute, every hour and so on. Save the /etc/crontab and your job should execute every minute. There is no need to do any service restart.

Editing the user level crontab file using the crontab command

The other way is to create a new crontab file using the option -e (edit) with crontab, which is mostly meant for non-root users. This file will have the same name as the username and can be found at the location: /var/spool/cron

The crontab syntax is similar to the previous one, except that instead of 7 fields, there are only 6. The username is not required.
Create a new crontab file using the command:
crontab -u root -e
or simply

crontab -e

and add an entry like this:
* * * * * /home/build_auto/echo.sh

Remember, no username here, the crontab command has already taken care of it through the -u option. (or through the current user if -u is omitted) Save the file and now your cron script should be executed every minute. Confirm your entry by listing down the crontab list for user root:

99EP68903:/home/build_auto # crontab -u root -l
# DO NOT EDIT THIS FILE - edit the master and reinstall.
# (/tmp/crontab.XXXXosSNdV installed on Mon Apr 5 22:03:11 2010)
# (Cron version V5.0 -- $Id: crontab.c,v 1.12 2004/01/23 18:56:42 vixie Exp $)
* * * * * /home/build_auto/echo.sh
You can also see the same in the file /var/spool/cron/tabs/root.


Making mistakes

In case, as a noob you create an entry "* * * * * root /home/build_auto/echo.sh" using the crontab -e command, you will get mail error messages like this one:

From root@linux.local Mon Apr 5 22:01:01 2010
Return-Path:
X-Original-To: root
Delivered-To: root@linux.local
Received: by linux.local (Postfix, from userid 0)
id CC5ED320408; Mon, 5 Apr 2010 22:01:01 +0530 (IST)
From: root@linux.local
To: root@linux.local
Subject: Cron root /home/build_auto/echo.sh
X-Cron-Env: <SHELL=/bin/sh>
X-Cron-Env: <HOME=/root>
X-Cron-Env:<PATH=/usr/bin:/bin>
X-Cron-Env: <LOGNAME=root>
X-Cron-Env: <USER=root>
Message-Id: <20100405163101.cc5ed320408@linux.local>
Date: Mon, 5 Apr 2010 22:01:01 +0530 (IST)
Status: R

/bin/sh: root: command not found

This can be misleading, and it can be easily misunderstood as if the cron is unable to locate /bin/sh. But in fact cron is trying to execute a command with the name "root", which does not exist.


This is because cron expects a command in the sixth field.

After a few minutes, upon successful executions of the cronjob the test.txt should look like:

99EP68903:/home/build_auto # cat test.txt
test
test
test
test
test
test
test


And one more thing, ensure that in your shell script the PATH of all files resolves to absolute path, any relative path like ./test.txt would resolve through the home directory of the user that is executing the cron job.


#end of post

Thursday, April 1, 2010

Getting root on Ubuntu Intrepid Ibex

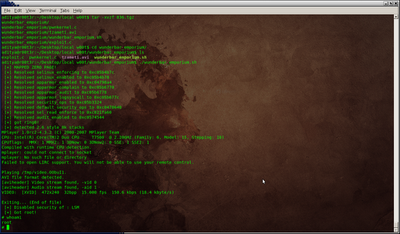
So this turns out to be the lamest posts of all time. When I am high I just run a list of kernel exploits to gain a local root on my Ubuntu. A bit of uname here:

uname -a Linux r00t3r 2.6.27-7-generic #1 SMP Fri Oct 24 06:42:44 UTC 2008 i686 GNU/Linux

Download the exploit:

http://inj3ct0r.com/sploits/836.rar

Result is in the screensh0t:


As far as I remember it didnt work on kernel 2.6.31, Ubuntu 9.1.
#end of p0st

Monday, February 8, 2010

HeartBeat Linux problem

Related to Heartbeat package for High Availability Clusters (SLES 11)
The apache resource script was failing, for this reason the whole cluster wasnt working fine. I searched so much, but couldnt find the reason..

node242:/etc/ha.d/resource.d # ./apache status
2009/05/08_02:41:04 ERROR: command failed: sh -c wget -O- -q -L --bind-address=127.0.0.1 http://localhost:80/server-status | tr '\012' ' ' | grep -Ei "[[:space:]]*" >/dev/null
2009/05/08_02:41:04 ERROR: Generic error
ERROR: Generic error

Then I set up the debug flag set -x in the shell script, and I got the location of the actual file where the command was failing. Its in:

/usr/lib/ocf/resource.d/heartbeat
Here in the apache script, I saw the following code, which was in fact preparing the wget command parameters.

#
# It's difficult to figure out whether the server supports
# the status operation.
# (we start our server with -DSTATUS - just in case :-))
#
# Typically (but not necessarily) the status URL is /server-status
#
# For us to think status will work, we have to have the following things:
#
# - $WGET has to exist and be executable
# - The server-status handler has to be mapped to some URL somewhere
#
# We assume that:
#
# - the "main" web server at $PORT will also support it if we can find it
# somewhere in the file
# - it will be supported at the same URL as the one we find in the file
#
# If this doesn't work for you, then set the statusurl attribute.
#
if
[ "X$STATUSURL" = "X" ]
then
if
have_binary $WGET
then
StatusURL=`FindLocationForHandler $1 server-status | tail -1`
if
[ "x$Listen" != "x" ]
then
echo $Listen | grep ':' >/dev/null || # Listen can be only port spec
Listen="localhost:$Listen"
STATUSURL="http://${Listen}$StatusURL"
case $WGET in
*wget*) WGETOPTS="$WGETOPTS --bind-address=127.0.0.1";;
esac
else
STATUSURL="${LOCALHOST}:${PORT}$StatusURL"
fi
fi
fi
test "$PidFile"
}


From the comments I figured out that server status check wasnt required in my case, its best to comment that out for my case, the problem seems to be that the wget command itself isnt getting executed by the shell.

monitor_apache() {
if
! have_binary $WGET
then
ocf_log err "Monitoring not supported by $OCF_RESOURCE_INSTANCE"
ocf_log info "Please make sure that wget is available"
return $OCF_ERR_CONFIGURED

elif [ -z "$STATUSURL" ]; then
ocf_log err "Monitoring not supported by $CONFIGFILE"
ocf_log info "Please set the statusurl parameter"
return $OCF_ERR_CONFIGURED
fi

if
silent_status
then
#ocf_run sh -c "$WGET $WGETOPTS $STATUSURL | tr '\012' ' ' | grep -Ei \"$TESTREGEX\" >/dev/null"
else
ocf_log info "$CMD not running"
return $OCF_NOT_RUNNING
fi
}


So I commented the line:
#ocf_run sh -c "$WGET $WGETOPTS $STATUSURL | tr '\012' ' ' | grep -Ei \"$TESTREGEX\" >/dev/null"

and my problem was fixed.


node242:/etc/ha.d/resource.d # ./apache status
Script name is : /usr/lib/ocf/resource.d//heartbeat/apache
2009/05/08_02:46:29 INFO: Running OK
INFO: Running OK

Installing a Module in Perl through source

I am very new to perl. No idea how to make things work in perl. I mean resolving errors and that kind of stuff. I can write programs with some google help. Two days back I wanted to generate a malformed UDP packet, a packet with an Invalid UDP length field. This kind of packet was notorious for causing a DOS attack on older Unix systems (dont know whats the current status). Sure it was fun. But yes, I found a useful tip for a perl beginner like me. It happens when your code requires a perl module that is not available in your current perl installation. In such cases you see errors like:

Can't locate Socket6.pm in @INC (@INC contains: /usr/lib/perl5/5.10.0/s390x-linux-thread-multi /usr/lib/perl5/5.10.0 /usr/lib/perl5/site_perl/5.10.0/s390x-linux-thread-multi /us
r/lib/perl5/site_perl/5.10.0 /usr/lib/perl5/vendor_perl/5.10.0/s390x-linux-thread-multi /usr/lib/perl5/vendor_perl/5.10.0 /usr/lib/perl5/vendor_perl .) at /etc/ha.d/resource.d/l
directord line 721.
BEGIN failed--compilation aborted at /etc/ha.d/resource.d/ldirectord line 721.

Obviously it means that my Linux doesnt have the perl module named Socket6.pm. It happends many times that if I google with this error string, I may or may not find a quick solution. The better way is to go to the CPAN search site

http://search.cpan.org/

and search for Socket6.pm

This will give you the package that has Socket6.pm in it. Again there can be two ways of installing it, either you install it through CPAN or install it by source. I preferred the second method as my linux machine had some internet connectivity issues.

So download the tar.gz package from the results returned by search.cpan, extract it and install it using the commands

tar -xvzf package.tar.gz
perl Makefile.pl
make
make test
make install

tcpdump

This is for reference, its not a guide but just a list of usage commands that I picked from various sources. Yeah I admit, I am one of those lamers who prefer to google than reading the man page. :/ Most are picked from wireshark's homepage :

http://openmaniak.com/tcpdump.php

1.tcpdump
2.tcpdump -v //verbose
3.tcpdump -D //lists devices
4.tcpdump -n //avoid dns lookup
5.tcpdump -q // quick output
6.tcpdump udp // capture udp packets only :: useful
7.tcpdump -w capture.cap //save the capture to a file named capture.cap :: useful
8.tcpdump -r capture.cap //read dump from capture.cap
9.tcpdump host abc.com //packets coming from or going towards abc.com ::useful
10.tcpdump src xx.xx.xx.aa and dst xx.xx.xx.bb
11.tcpdump -A //displays the packet's content ::useful
12.tcpdump -i eth1 //capture on interface eth1
13.tcpdump -v -A udp and dst 192.168.69.238 or dst 192.168.69.242 -i eth1
14.tcpdump -n -S -s 15000 -vv -X 'host 192.168.0.159 and udp and port 1717'
-S print absolute IP sequence number (not relative)
-n no address resolution
-s size of capture for each packet (15000 should be enough to hold data returned by query,
you will have to play with this depending on what type of query you issue)
-X print HEX and ASCII version of packet 'host 192.168.0.159 and udp and port 1717'

for an exhaustive list, see the man page

http://linux.die.net/man/8/tcpdump

Exceeding Windows Remote Desktop Limit

While making a Remote desktop connection, the maximum number of allowed connections is 2. And when this limit is reached, you see an error message of the sort:

When you close the remote desktop window using the 'x' sign in the top right corner, you DISCONNECT from the windows session. However windows keeps your session alive in its memory. So that when you try to relogin it assigns the active session in its memory to you. Closing the window using the 'x' button doesnot make you logoff. Your session remains active, only that your state is 'DISCONNECTED'. So sometimes when the number of sessions is 2, even though they are disconnected, still windows shows you this message. You can use a third reserved connection to remotely login into windows:

type this command in your command prompt:

start mstsc -v:xx.xx.xx.xx /f -console

and this will open the third connection. You can use this connection to kill the other disconnected sessions through taskmanager. xx.xx.xx.xx is the IP of the windows machine.

Failed to find VM - aborting Red Hat

In case you are using RedHat 5.* Linux, and you a message like this while installation:

Failed to find VM - aborting


You need to disable Selinux.
Go to /etc/selinux directory, open the file config, which would look like:

# This file controls the state of SELinux on the system.
# SELINUX= can take one of these three values:
# enforcing - SELinux security policy is enforced.
# permissive - SELinux prints warnings instead of enforcing.
# disabled - SELinux is fully disabled.
SELINUX=disabled
# SELINUXTYPE= type of policy in use. Possible values are:
# targeted - Only targeted network daemons are protected.
# strict - Full SELinux protection.
SELINUXTYPE=targeted

Change the line SELINUX=enforcing to
SELINUX=disabled